This ladi pav aka Indian dinner rolls are amazingly soft, feathery light, and fluffy. Learn how to make these at home with all the possible tips and tricks!

I never imagined I would be baking bread at home. But then as you know things happen and you end up doing things you never dreamt about doing in the first place.
As intimidating as baking bread seem, it really isn’t, once you get past that initial fear! I still consider myself an amateur in this area, and still have a long way to go!
The different kinds of flour, bakers percentage, hydration, bulk ferment, sourdough, artisan, Polish, biga to name a few are words that I’ve probably never ever come across before! Now I know the words, but still, have to know how to work with a couple of them. For today let’s see how to make these basic eggless ladi pav bread recipe.

Table of Contents
What is it about a home-baked bread, when it’s available commercially?
If you do make bread at home, you would agree with me on the following points:
- Baking is therapeutic. The whole process of kneading the dough and seeing it rise and transform to the finished product fills one with a lot of satisfaction.
- The aroma of freshly baked bread wafting through the kitchen is simply divine!
- When you bake your own bread you know what goes into it and are assured of the quality.
- Finally the joy of biting into a piece of that bread, slathered with some butter !! Heaven! The simple joys in life!!

I began my bread baking journey immediately after moving here to the US almost 3 years ago. I missed the ladi pav that we would get in Mumbai and so had to try making them at home.
When I think of pav, a number of dishes come to mind, like pav bhaji, cheese pav bhaji, misal pav, masala pav, vada pav, omelette pav, maska pav and the list goes on! In order to enjoy these dishes, you seriously need some good pav bread!
My first attempt at making bread was a disastrous whole wheat sandwich loaf bread until I realized and came across another word in the bread dictionary – ‘ gluten’!

Ingredients needed
To make these easy Bombay ladi pav, you will require the following;
- All-purpose flour: I’ve used regular all-purpose flour for this recipe. You can also use bread flour. I do not recommended using 100% whole wheat flour as the rolls will be dense, unless you add gluten in this recipe. Also, the liquid proportions will change.
- Yeast: I’ve used active dry yeast, which needs to be activated before using it. You can also use rapid rise yeast or instant yeast, these don’t need to be activated and can be added directly with the dry ingredients.
- Sugar: This is need to activate the yeast.
- Kosher salt: to flavor up the bread. You can also use regular table salt or sea salt.
- Lukewarm milk: Milk adds richness to the dough, the resulting pav buns are tender, have a soft crumb and a golden crust.
- Butter: also adds richness to the dough. Adding a little fat in the form of butter or oil helps preserve the bread for longer.
The best pav recipe, adapted from my Mother’s recipe book
As I’ve mentioned before I got my hands on my mum’s age-old recipe book, and was elated to find this pav bread recipe.

I made the following changes;
- Instead of 450 grams flour, I’ve used 4 cups of flour (approx 575 grams flour).
- Also, the recipe calls for block yeast, I’ve used the same quantity of active dry yeast. If you buy yeast in packets, then one packet (2 & 1/4 teaspoons) is more than sufficient to rise this quantity of flour.
I’ve increased the salt to 1.5 teaspoons for more flavor. - The recipe doesn’t specify the quantity of the liquid. I chose to use milk instead of water for reasons mentioned above in the detailed ingredients list. The quantity of milk is something that I have experimented with a lot in terms of hydration and for me, 1 & 2/3 cups liquid yields the best results. You may require anywhere between 1 & 1/2 to 1 & 2/3 cups depending on climatic conditions.

This ladi pav bun is feather light, fluffy and extremely delicious 🙂 This is a fail-proof recipe that I have tried and tested many times. It is guaranteed to give you the perfect dinner rolls if you follow all the steps correctly.
With experience and practice, you will get a hang of how the dough should feel and everything else that comes along with bread baking, so it will only get better with time 🙂

Important pointers to keep in mind while making this recipe
I have tried to cover as many details as possible in the stepwise pictorials, keeping in mind all the experiences I have dealt with in making ladi pav rolls. Sometimes they would turn out hard, sometimes soft. Keep in mind the following tips and you will be making endless batches of these dinner rolls like a pro!
Measure the ingredients accurately
I always recommend using a weighing scale to measure out the ingredients, especially the flour. If you are bake very often, I highly suggest you invest in a weighing scale.
Do not proceed without activating the yeast
If using active dry yeast, please do not proceed without activating the yeast first.
Avoid adding extra flour
Do not add more flour than that called for in the recipe. Adding more flour will result in hard dinner rolls, add few tablespoons flour at a time if it is still very sticky or simply grease your palms with more butter if required. The dough should be soft and tacky but not sticky.
The difference between sticky and tacky
The difference between sticky and tacky is crucial and an important factor to achieve soft rolls. You don’t want the dough to be over hydrated.
If you touch the dough, pull back and find some residue sticking to your finger, the dough is sticky.
If you touch the dough, pull back and find it leaves your finger easily without much residue, it is tacky and the right consistency. You can go ahead and proof the dough.
Use a bench scraper or a knife to divide the dough into equal sized rolls
Avoid tearing the dough by hand as it will tear the gluten strands which you worked so hard to develop.
Hope you find this easy ladi pav recipe with all these tips, tricks, and details useful 🙂
You may also enjoy these bread recipes

How to make ladi pav at home – Step by step instructions
Step 1: Activate the yeast
Add 2.5 teaspoons of active dry yeast & 1 teaspoon sugar to 1/3 cup of lukewarm milk/water. Leave it in a warm place for about 10-15 minutes or until it is all frothy and bubbly. If the yeast is not frothy and bubbly, it means it is not activated, discard and start over again.

Step 2: Prepare the dough
Measure the flour using a measuring cup (4 cups) or weigh the flour (575 grams), sift in a large mixing bowl, add 1.5 teaspoons of salt, activated yeast mixture, and the remaining 1 & 1/3 cup lukewarm milk/water.

Mix the contents of the bowl using a spatula/ or with your hands.

Dust your work surface with very little flour, transfer this sticky dough, add 2 tablespoons of butter, and start kneading until you get a soft & pliable dough.

This will take approximately 10-12 minutes, but the dough will definitely come together.
You can use a bench scraper to scrape the dough off the work surface and keep folding to make it easier.
Once the dough is done, poke it with your finger, if it springs back, it is ready for the next step.

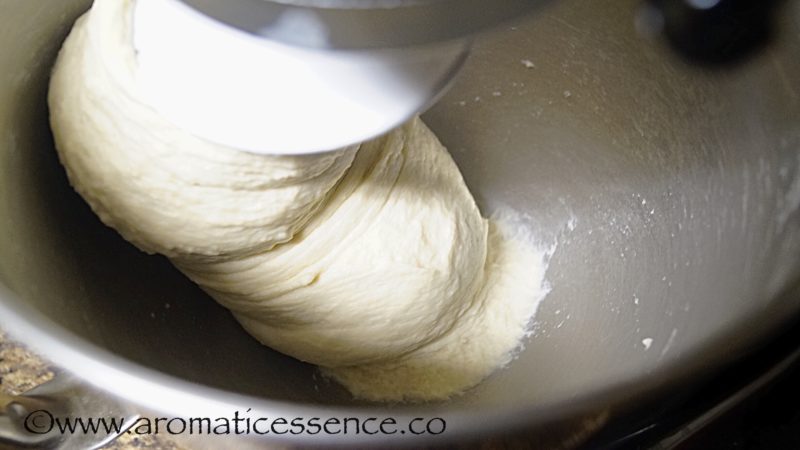
If you are kneading in a stand mixer– You want the dough leaving the sides, but you still want to see a blob of dough at the bottom under the dough hook.
If it’s coming away completely from the bottom, the dough is under hydrated and dry, this will result in hard dinner rolls. Here’s a pic for reference below.
This is another batch that was kneaded in the stand mixer. It is the right consistency of the dough – a bit tacky but not sticky. Transfer it to your work surface dusted with little flour, knead for another 1-2 minutes and follow the next step.
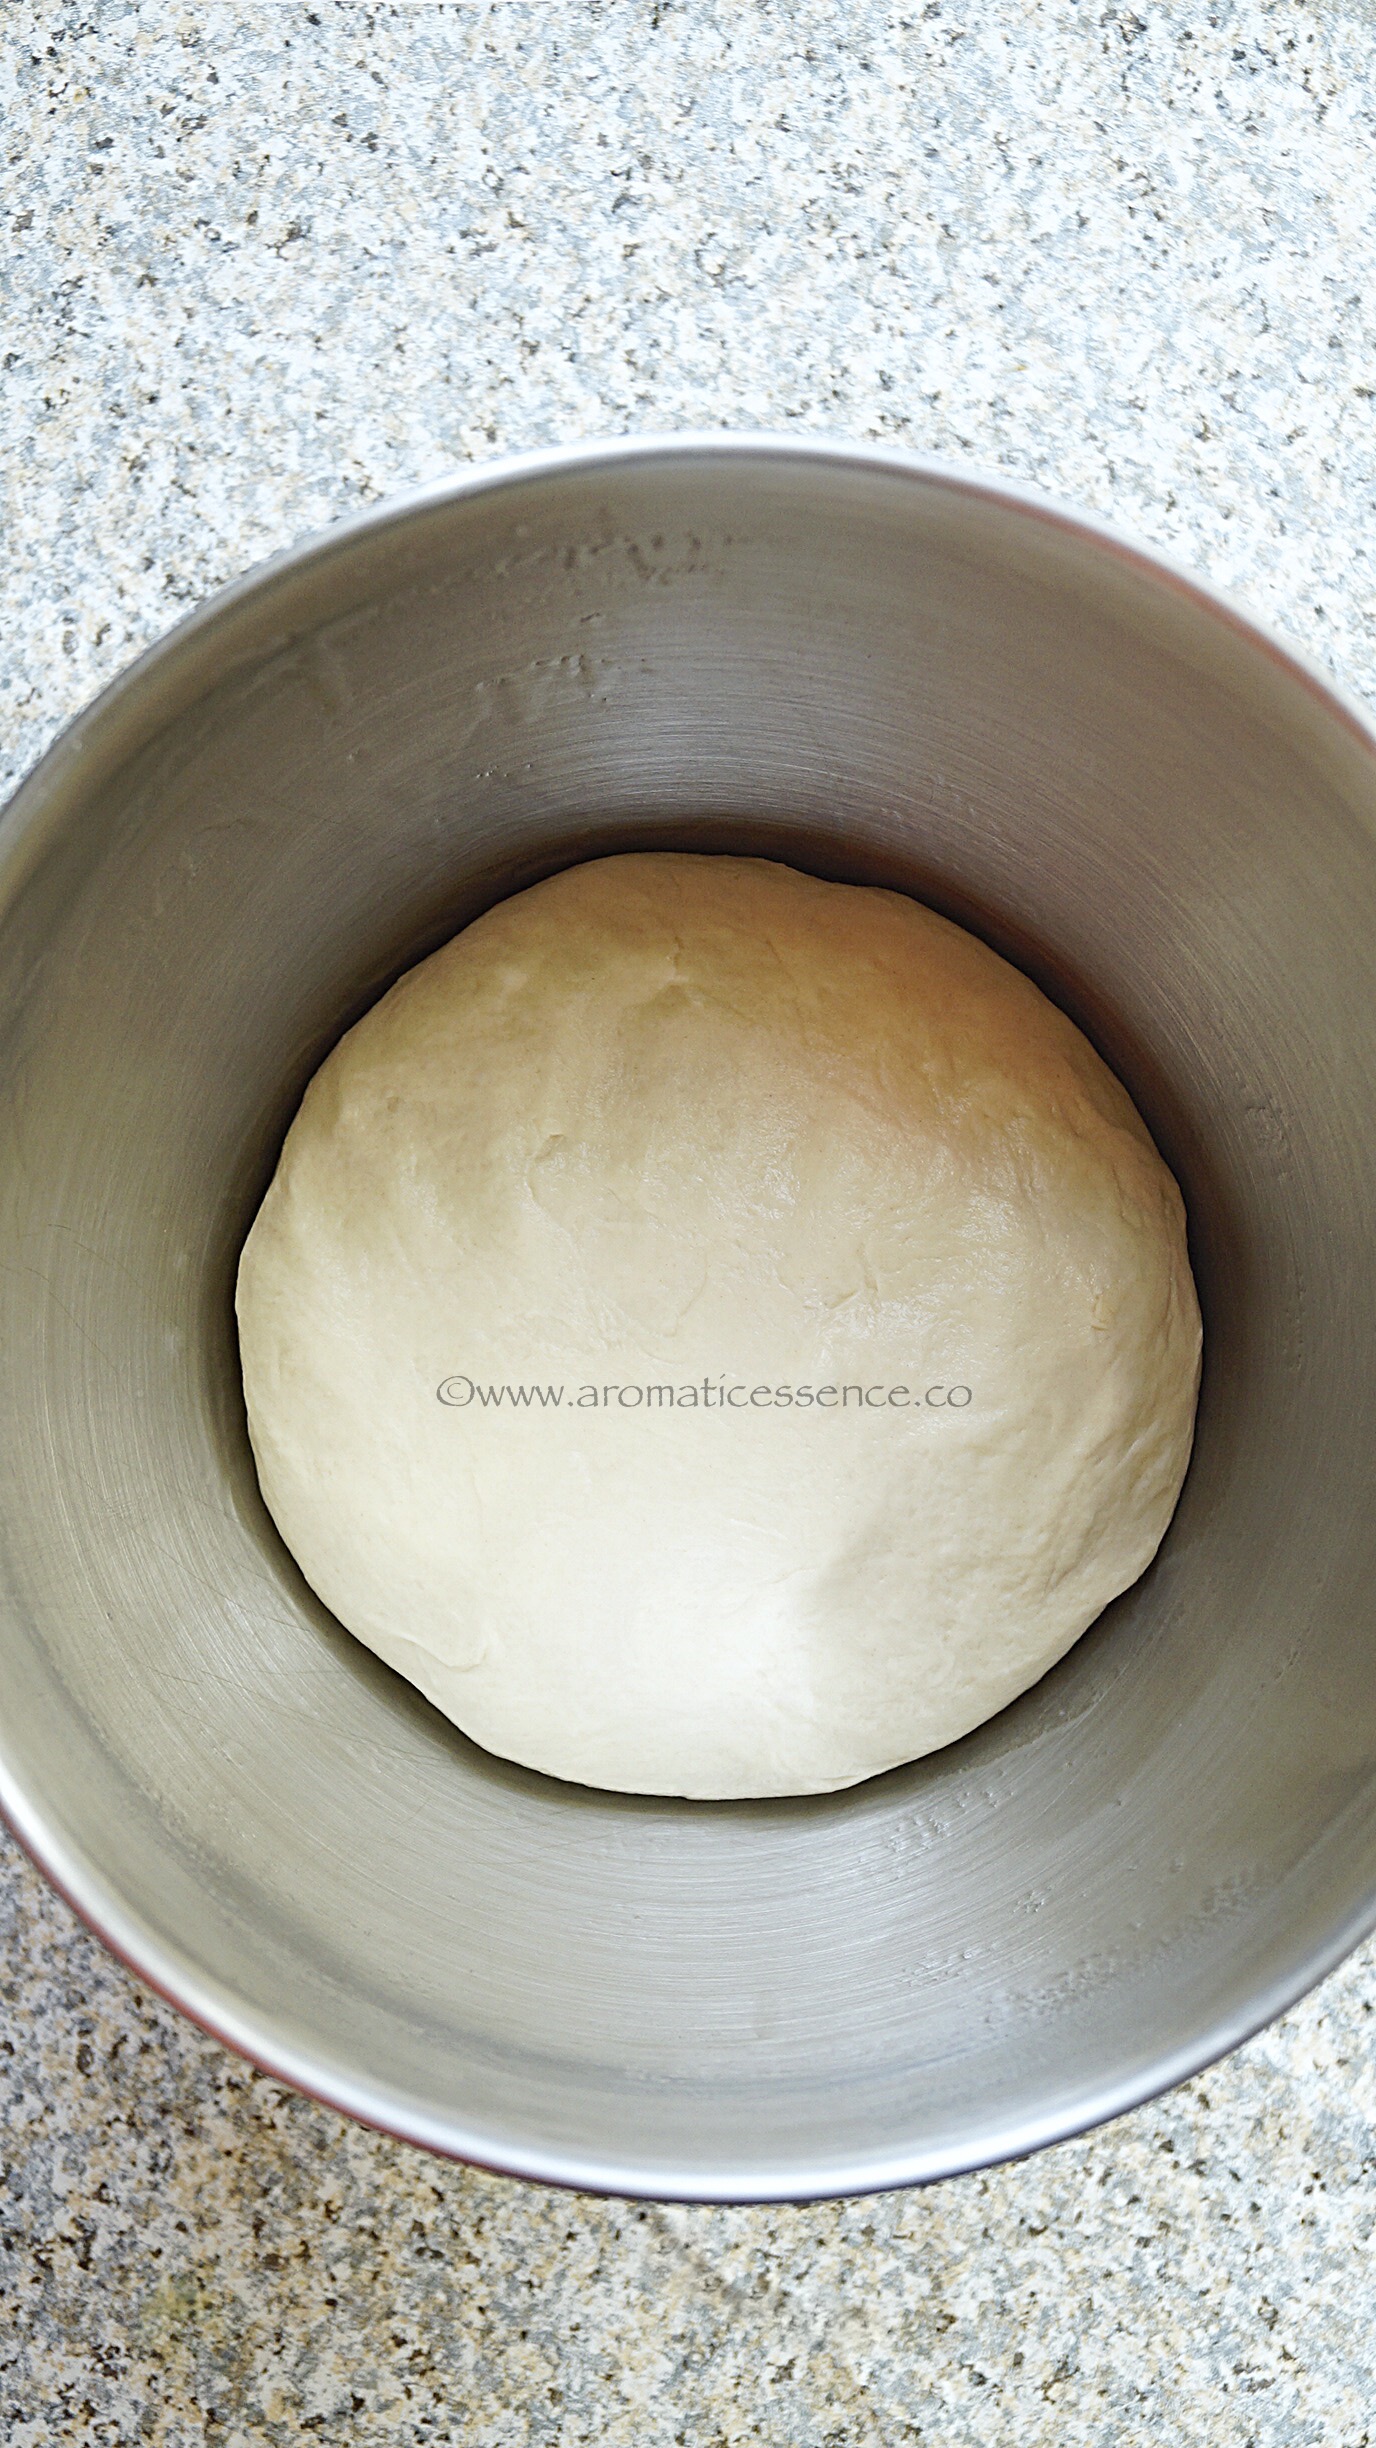
Step 3: Proof the dough (first rise)
Tuck the edges of the dough towards the center to form a ball and transfer it to a big greased bowl.
Spray some oil spray on the dough or apply little oil over the dough. Cover with a clean kitchen napkin, and set aside in a warm place to proof or double in size.
It may take anywhere from 45 mins to 1.5 hours depending on the climatic conditions.
Step 4: Deflate the dough and knead for few more minutes
After the dough has risen, deflate it by punching down the dough, and transfer to the working surface. Knead again for another 5 minutes at least, add very little flour if the dough is too sticky.


Step 5: Shaping and second proofing (second rise)
Cut the dough with a scraper/dough knife/ regular knife into equal portions and shape them into rolls. Tuck the edges underneath towards the center, roll the dough against your work surface or between your palms to form a smooth round ball.
If you have a weighing scale, you can divide the rolls equally. I just eyeballed it.

Place them in a greased 9 x 13 greased baking tray. Leave little space between each. Cover with a damp kitchen cloth and let it proof for the second time. This will take approximately 30 minutes depending on the weather conditions.
Step 6: Baking
Preheat the oven to 400 F, Brush the risen dough balls with milk for a nice brown colored crust. Bake for about 15 -18 minutes or until they are done and the top is golden brown.
The top of the rolls will appear hard as soon as you remove it from the oven. You should be able to hear a hollow sound when you tap on top of the roll, that’s how you know it is well cooked. I remove mine at 18 minutes.

Remove the prepared rolls from the oven and brush with remaining 1 tbsp butter whilst still warm. They will soften once they start cooling down. Enjoy these, slathered with some butter or with bhaji or any curry of your choice.
Notes
- How to knead bread dough? Take a look at this quick video by King Arthur Flour.
- Shaping dinner rolls require a technique, it is not simply just rolling the dough into a ball, refer this quick video to get an idea.
- To store the rolls, place them in an airtight container or ziplock bag. They stay good for 2-3 days at room temperature.
If you buy yeast in packets, then 1 packet i.e 2 & 1/4 teaspoons are sufficient for this recipe too. - You may use half milk and half water.
- This same recipe can be used to make homemade buns too. Only remember to place them at least 3 inches apart so that they the buns don’t touch each other after proofing, and they maintain their round shape.


★ If you try this pav recipe, I would love to hear from you! I’d appreciate it if you could rate and leave a review below in the comments. Your reviews help others know the recipe better too. Feel free to share your feedback and suggestions at aromaticessence77@gmail.com. Thanks so much 🙂
You can also follow me on Facebook, Pinterest, Instagram & Twitter
Ladi Pav | Ladi Pao | Pav Recipe (Eggless Dinner Rolls)
Ingredients
- 4 cups / approx 575 grams all-purpose flour, plus more for dusting as required (spooned and leveled)
- 1 teaspoon sugar
- 1.5 teaspoon Kosher salt
- 2.5 teaspoons active dry yeast*
- 2 + 1 tablespoon unsalted butter,
- 1 & 2/3 cups lukewarm milk, approx 415 ml
- 2 teaspoons Oil/oil spray, to grease the bowl and the dough.
Instructions
- Add active dry yeast & sugar to 1/3 cup of lukewarm milk/water. Leave it in a warm place for about 10-15 minutes or until it is all frothy and bubbly.
- Measure the flour using a measuring cup or weigh the flour, sift in a large mixing bowl, add the salt, activated yeast mixture, and the remaining 1 & 1/3 cup lukewarm milk/water.
- Mix the contents of the bowl using a spatula/ or with your hands.
- Dust your work surface with very little flour, transfer this sticky dough, add 2 tablespoons of butter, and start kneading until you get a soft & pliable dough.
- This will take approximately 10-12 minutes, but the dough will definitely come together. You can use a bench scraper to scrape the dough off the work surface and keep folding to make it easier. Do not add more flour, as it will result in hard dinner rolls, add few tablespoons flour at a time if it is still very sticky or simply grease your palms with more butter if required. Once the dough is done, poke it with your finger, if it springs back, it is ready for the next step.
- Tuck the edges of the dough towards the center to form a ball and transfer it to big greased bowl. Spray some oil spray on the dough or apply little oil over the dough. Cover with a clean kitchen napkin, and set aside in a warm place to proof or double in size. It may take anywhere from 45 mins to 1.5 hours depending on the climatic conditions.
- After the dough has risen, deflate it and transfer to the working surface. Knead again for another 5 minutes at least, add very little flour if the dough is too sticky.
- Cut the dough with a scraper/dough knife/ regular knife into equal portions and shape them into rolls. Tuck the edges underneath towards the center, roll the dough against your work surface or between your palms to form a smooth round ball. If you have a weighing scale, you can divide the rolls equally. I just eyeballed it.
- Place them in a greased 9 x 13 greased tray. Leave little space between each. Cover with a damp kitchen cloth and let it proof for the second time. This will take approximately 30 minutes depending on the weather conditions.
- Preheat the oven to 400 F, Brush the risen dough balls with milk for a nice brown colored crust. Bake for about 15 -18 minutes or until they are done and the top is golden brown. The top of the rolls will appear hard as soon as you remove it from the oven. You should be able to hear a hollow sound when you tap on top of the roll, that's how you know it is well cooked. I remove mine at 18 minutes.
- Remove the prepared rolls from the oven and brush with remaining 1 tablespoon of butter whilst still warm. They will soften once they start cooling down. Enjoy these, slathered with some butter or with bhaji or any curry of your choice.
Notes
- To store the rolls, place them in an airtight container or ziplock bag. They stay good for 2-3 days at room temperature.
- If you buy yeast in packets, then 1 packet i.e 2 & 1/4 teaspoons are sufficient for this recipe too.
- You may use half milk and half water.
- This same recipe can be used to make homemade buns too. Only remember to place them at least 3 inches apart so that they the buns don’t touch each other after proofing, and they maintain their round shape.

Fabulous recipe. Just a quick question. You mentioned about preheated temperature of the oven. But what’s the exact oven setting and what temperature should the pav be baked at for how long when u keep them in the oven. Am going to try it in an OTG oven so any tips?
Thanks, Ashwini 🙂 It is 400 degrees F (200 degrees C) as mentioned in step 10, so you would preheat at 200 C for 10-15 minutes. Keep both the top and bottom rods on for the OTG. And also position a rack in the middle of the oven. Keep an eye on the browning, but avoid opening the oven door as it can cause temperature fluctuations. Check after 16 minutes. Usually, mine is done around 18 minutes, but as every oven differs, you will need to see what works best for you. There isn’t much to be worried about your OTG settings, what you really need to get right is the consistency of the dough. Avoid excess flour, simply grease your palms with oil and continue kneading if the dough seems to be too sticky. A few tablespoons of flour are okay, but try to minimize it as much as possible. If you follow these measurements accurately, you should not have any issues. The dough is sticky and does take time to come together to that tacky stage, so you need some patience, but the results are beautiful 🙂 Do share how they turn out whenever you try!
You deliver what you promise… well your recipes do!!
Thanks so much, Rashmi! Those dinner rolls looked great, glad you loved them 😊
Hello. This is a wonderful recipe. I tried it last week & the pav turned out to be super soft. I want to double up the recipe, so is this recipe scalable? Specifically if I double the ingredients, do I need to double the quantity of yeast as well? Also, will doubling impact my baking time? If yes, how much.
Hi Bhuvan! That’s great, so glad to hear this! Yes you will have to double everything. It would take quite some time to knead the dough, other than that there shouldn’t be a problem.
The baking time will stay the same. Depending on the size of your oven, you may need to bake in two batches. If you bake both the batches the same time, then flip them midway from top to bottom and vice versa so that both bake evenly.
Thanks for such a detailed recipe Freda. Have tried pav buns before but have never got the super texture that your recipe gives. Phenomenal!!!
Hi Maddy! I’m really happy to hear that, thanks so much for sharing your feedback with us 🙂
Thank you for the excellent recipe Freda! Very detailed and clear !!
I have one query on baking the ladi-pav or any bread for that matter. Should we turn on the top heat of the oven as well or use convection mode? I have a built in manual oven so it does not have automatic bake setting. There is bottom heat, top heat, top grill and fan. Which combination would be good to get soft bread and with a good crust/color on the top.
Hi Pradnya! I’m glad you found the post helpful. Actually I baked these in a conventional oven, I have no experience of using a convection oven. But now that I’ve moved back to India, I will be trying this in a convection oven, and will definitely update this post. For now, I’d say experiment with half of the batch, and use both the top and bottom rod on. Is it possible to bake using the bottom rod initially, then turn on the top rod, say after 15 minutes to brown the crust? If yes, then you can also try doing that. Would love to know how it turns out.
This recipe is so far the best i have tried.
I have used bread flour and instant yeast but proofed it similar to active dry.
Thank you for writing such a detailed recipe and also having the links for videos for kneading and making the dough rolls.
Also your comment on keeping it only for 30 minutes after second rise is helpful. I kept it longer once and they fell flat.
9 x 13 pan works better than having a cookie sheet as the breads actually rose more. The pav was more flat when i used a cookie sheet.
Hi Pooja! Thanks so much for sharing your feedback. I am glad to know you found all the pointers handy 🙂
Your recipe is spot on, Freda! I’ve tried it so many times now and it always turns out perfect. Today I made sausage buns using your tecipe. Turned out superb!
Hi Anita! Yay!! That’s awesome, so happy to hear this! Thanks for sharing your feedback:)
Hi Freda. Both my proofings were good. Increased in size. But the paos shrunk during baking. What must have gone wrong.
Hi Rita! How long did you knead the dough? This could happen if you didn’t knead the dough long enough for gluten to develop. Next time, do a test called the windowpane test. Take a small piece of dough, and stretch it slowly without applying much pressure. If it stretches without tearing apart and you can see light through the thin membrane, the dough is ready for proofing. If the dough tears apart, it needs more kneading. Secondly, it could have also collapsed, if you over-proofed the second time. The yeast get exhausted due to which the rolls can turn flat on baking. Keep in mind these two things. Do come back and share if this helps next time 🙂
Hi Freda,
Thanks much for the very discreptive recipe….have been searching for the perfect recipe of pao…and my search ended when I read your recipe…baked my first bread today….just followed your recipe to the T….and the product was just amazing…just a query- if I use whole wheat baking flour instead of all purpose flour….what is the proportion of gluten that needs to be added..to get perfect raised bread….thank again
Hi Dr Suvyl, I’m so glad to hear this! You will need about 1/4 cup of vital wheat gluten for 4 cups of wheat flour. You may also need to add 3-4 tbsp more of milk or water, basically you want the dough to be the same consistency as the one made with regular flour. Please do share your feedback, if you happen to try these rolls with wheat flour. Thanks!
Thanks you so much for the recipe. I used instant yeast and i saw in one of your post to use 2 tsp of instant yeast. What about the water quantity that needs to be used as in your recipe you are 1/3 up water to activate the yeast and rest for the dough. Since we are not activating the yeast, should i use 1 and 1/3cup water or less than that? My dough was very sticky using 1 and 1/3rd cup water…hence checking.
Hi Lalitha! Yes the water qty remains the same. The dough is sticky, it’s meant to be, you have to keep kneading, grease your palms to make it easier. And avoid adding more flour as the rolls will turn out dense and hard.
Such a wonderful recipe. Followed your recipe, halved the recipe and got the perfect one!
What are the changes to this recipe to make loaf bread? How to fold and put it in the tin and what would be the baking time?
Thanks much!
Hi Shree! Glad you liked it. I do hope to post a sandwich bread soon. You can use this same recipe, reduce the milk or water to 1.5 cups, rest everything will stay the same. After the first proof, deflate the dough and shape in a 9-inch log. Then transfer to a greased loaf pan, and let it proof until it is 1 to 1.5 inches over the rim of the pan. Bake at 350 degrees F for 30-35 minutes or until the top is golden brown. If you think the bread is browning too quickly, cover it loosely with an aluminum foil after 20 minutes of baking, and continue baking for the next 10-15 minutes until done. Remember to cool it completely before slicing, or else the texture of the bread will change.
I have tried many pav recipes but your’s has just worked right for me and it came out so well. I am from Bangalore but my husband is from Pune and he keeps complaining that he never gets good pav in Bangalore.
Thank you so much & God bless you.
Hi Zeena! I’m so happy to know that you loved it! Thanks so much for sharing your feedback! I truly appreciate it 🙂
Freda,
Thank you so much for the detailed recipe. Tried it and dinner rolls came out perfect.
Thanks so much for sharing your feedback, TD 🙂
Tried ur recipe today.. Paos came out pretty good.. I just wanna know can we skip the 11th step of brushing them with butter because some of the flavour nd smell of butter transfers in the pao which I dint like.. Will they turn dry if we don’t apply butter or do we have some other option.
Hi Rashmi, butter is used to soften the crust after baking. Skip it if you want to. The crust will soften over time.
Hi tried pav recipe today. Excellent result. Made it in convection . Had with bhaji. Thanks for the recipie.
Hi Geeta! Thanks so much for sharing your feedback:)
Hello
Can u plz tell me how much active dry yeast to be added if v make pav of 1 cup flour n Crown Active dry yeast v can use for this recipe plz reply?
Eager to try this pav as i have baked earlier with other recipe thy were nice but didnt rise much after baking during bakin i can see them rising but sat down afterwards so want a try ur recipe?? Thank you in Advance
Hi Jalpa! You want to make it with only 1 cup flour? Then you use a little less than 3/4 teaspoon.
Hi Freda! I tried your pav recipe & it was perfect. Thank you for step by step instructions.
Thanks for sharing your feedback with us, Kamal 🙂
Hi, I tried this recipe today. It was just perfect.
Thanks for sharing your feedback, Cheryl Anne 🙂
Hi! Thank you for sharing eggless pav ,I tried your recipe and followed exactly the way it is written . What I noticed my dough was little sticky . Second thing my pav came up hard, don’t know where I went wrong
Hi Reena! I’m assuming because you said sticky, you added more flour. If you added more flour, that could explain why the rolls turned out hard. The dough has to be kneaded well, once it reaches that stage, it is easier to handle and it gets less sticky. That’s why I’ve suggested greasing your palms instead of adding more flour than that called for in the recipe. That helps to an extent.
Thank you for your reply. Happy to share that my 2 trail came out very well . Can we use same measurement for whole wheat pav or can you plz share share your fail proof recipe.
Hi Reena! That’s great 🙂 I’ve tried with whole wheat and it was really dense. You need to add gluten along with wheat flour. Also, the liquid measurements change. Try with 50% of atta and maida. And now you know the consistency of the dough, so make sure it’s same to avoid hard rolls again.
Thank you for your swift reply. Big fan of your recipes ❤️. Can you plz share your idea that how much virtual gluten will be good if I follow same measurements in above recipe and water measurements will decrease or increase? what should be the measurements for water too . Thank you once again
Hi Reena! Thanks so much. I have to test this recipe with wheat flour again to provide accurate measurements. So unfortunately I can’t tell you for sure the liquid measurements for now. I will definitely make a whole new post with wheat flour. You need about 1/4 cup of vital wheat gluten for 4 cups of wheat flour. I suggest you cut this recipe by half. Use 1 cup of of maida and 1 cup of atta, the liquid would be approx about 1 & 1/3 cup for this batch. If the dough seems too dry, add a 1-2 tablespoon of liquid. This would be a good start rather than using all wheat flour.
Hi Freda how u doing.. Trying this receipe of yours today just a few questions… My tray is 11 by 13 what do i do..? Do i need to put a parchment paper in the base….
Once made how long should the pav cool… And how do i store it to eat the next day
Hi Sarika! There’s is no need of parchment paper. Simply grease the tray. Let the pav cool down completely, then store them in a paper bag, aluminum foil or an air tight container.
Hi..if using instant yeast will it be the same amount as active dry yeast or less..thx.
Hi Jagruti! Use 2 teaspoons of instant yeast.
Hi, I have tried making pav many times before but they were not up to the mark. Today I made them again as per your recipe and they turned out so well.!!!
I made them completely using water only as there is shortage of milk due to lockdown but to my surprise they were the best I made till date..
You have explained all terms and steps so well just like granny will explain things to us, totally loved it.❤
I will be making pav with this recipe frequently as we have shortage of wheat flour too… but your recipe is savior. Thank you so much once again!!
Hi TK! So happy to hear your experience! Yes, water works perfectly well for this basic recipe too 🙂 thanks for coming back and sharing your feedback, appreciate it 🙂
HI Freda!
I love your recipes. You’re orange cupcakes are a staple at my house and we all love it.
I really want to try these rolls/pav. But I can’t seem to find yeast anywhere. It is out of stock here in Canada almost all stores. Is there a substitute for yeast? I read that baking soda and lime juice may work. What do you think ?
Hi Aarti! Thanks so much 🙂
I’m really sorry Aarti, I haven’t tried making these without yeast. If you have flour to spare, you could try half a batch. Also check out this 2 ingredient dough recipe online that uses self raising flour, probably try that perhaps?
After 2 previous attempts at trying the pav using other recipes was so grateful when I succeeded with your recipe.The pavs were soft as ever .
Hi Elizabeth! I’m so happy to hear your experience! Thanks so much for sharing your feedback with us 🙂
even after kneading for 15 minutes, my dough doesnt become smooth.
i used rapid rise instant yeast.
Hi Pratima, I hope you measured all your ingredients properly. If the dough was still very sticky after 15 minutes, you could have added a tablespoon of flour at a time. But, you have to be careful as you don’t want to end up adding too much flour. The dough should be tacky, which means it is ok to have very little residue of dough on your fingers if you touch it.
Instead of butter can I use oil and how much. tIA
Hi Maris, sure you can, the same amount will do.
Absolutely delicious and loved the detailed recipe. Being a mumbai girl myself, I can imagine how important Pao is for all of us and nothing better than homemade paos Freda! I started baking 3 years back and do not buy store bought stuff anymore. So relaxing knowing good ingredients have gone into the making! Cheers!
Exactly why I love to make homemade bread! Thanks, Vidya 🙂
Can tell me how much of sugar tohh be added for 2 cups of flour? 1/2 tsp is it? Also whenever i bake pav i get lot of yeast smell in it why? What should be the ratio of flour: water:sugar:yeast. Please help
Hi Anjali! Can you try this recipe, it’s a foolproof pav recipe tried by many with great results. You can cut the recipe by half for a trial purpose. All the ingredients are in the recipe card.
Freda darling…i have tried this recipe twice…and i cannot tell how awesome it feels to see this gorgeous baked bread when done…so fulfilling…every step is so adventurous…love love baking bread just bcoz of your fail proof recipe…makes us feel so proud..God bless you dear.
Awww thank you so much for your awesome feedback, Jasmine:)
Hi Freda, can we make regular bread using the same measurements and technique or will it be different?
Hi Gayathri, simply reduce the water to 1.5 cups for sandwich bread, rest everything will stay the same. After the first proof, deflate the dough and shape in a 9 inch long. Then transfer to a greased loaf pan, and let it proof until it is 1 to 1.5 incheso over the rim of the pan. Bake at 350 degrees F for 30-35 minutes or until the top is golden brown. If you think the bread is browning too quickly, cover it loosely with an aluminum foil after 20 minutes of baking, and continue baking for the next 10-15 minutes until done. Remember to cool it completely before slicing, or else the texture of the bread will change.
Hi….if using fresh yeast, what is the quantity to be used for this recipe?
You need the double the quantity, so 4 & 1/2 tsp of fresh yeast, proceed the same way by activating it like the active dried yeast.
Thanks Freda.
Hi Frieda, I tried pav today, everything went well till the pav i had made was risen beautifully. but i went to bake them after 2 hrs n that time i saw they were flat. is it because i took long to bake after 2nd proofing?
Hi Sarika! Oh yes, you must avoid over proofing the dough after the second rise, once they rise and double up they are good to hit the oven. Over proofing causes more yeast to be used up which in turn will not help the dough rise in the oven, secondly, over proofing also causes the gluten structure to weaken, which causes the dough to go flat. Hope this helps.
How much flour would be 4 cups of flour in grams.That will give more accurate measure while baking rather than in cups.Did you use fat in this recipe because I am little confused hand written recipe says 30gms of fat but in your recipe there is no ingredient as such.What kind of milk did you use in your recipe vitaminD milk,1percent ,2 percent or fat feee milk?Waiting for your reply so that I can bake delicious bread at home without any preservatives and chemicals.Thanks in advance
Hi Bella, I’ve mentioned in the post, 4 cups is 576 grams. The fat mentioned is the butter used in this recipe. You can use any milk you wish. I always buy whole milk, so that’s what I’ve used here.
I’m gonna try this for sure… Just a li’l query.. Can we make a white bread loaf of the same recipe… If ys the how much dough will go in a 10/5 tin. Is there sm way or a standard of weight of dough for dimension of tin..? Pls help
I tried these today and my search for Pav ends here…. these are soooooo amazing. Totally in love with them, thank you so much for the awesome recipe with all the tips.
So glad to know, Rakhi 🙂 Thanks for sharing your feedback.
Which brand of yeast did you use in the US?
Hi Donna, I’ve used Fleischmann’s.
Dear Freda I am yet to try this out. It looks so good! But do you know whether I can make the dough the night before and bake in the morning. What will be the process? I know that many friends of mine in Europe freeze bread and bake in the morning. I am skeptical in the time needed in the morning of this process. Your thoughts or guidance on this would help.
Jenny
Hi Jenny! You can freeze this dough after the first rise, punch down the dough and place it in a cling wrap. Freeze it. Before baking you will need to thaw it for 2-3 hours, divide the dough, shape the dinner rolls, let it rise the second time then bake. Hope that helps 🙂
Fabulous post Freda. Love the detailed instructions.
Thanks so much, Dhwani 🙂
Home made dinner rolls are best:) looks very delicious!
Thanks Uma 🙂
Hi ! Can you please tell of we have to bake it with only bottom heat or both top and bottom
Hi Dhrisha! Yes, heat both.
Tried and tested!! This is a well explained Recipe and nothing can go wrong if you follow this recipe! Thanks !! Its a keeper in my kitchen 🙂
Awww thanks sweetie <3 Love how they turned out 🙂
I have not made Pao before. I know, I know… ^.^ Why I hadn’t made pao was because in europe we would always make something else such as Semmel or black bread or sunflower bread just to name a few. So it would not occurs to me to make any pao in Europe. In Goa I have always struggled to bake bread. I can make a pizza dough, but not bread, even if I use the European yeast, The commercially available dry yeast is of a bad quality in Goa and fresh yeast is not always available. I know people who travel 60 minutes just to get fresh yeast for their pizzerias etc. Also I believe baking successfully bread has a lot to do with the humidity and I still believe humidity doesn’t do bread rising too well. You might proof me wrong here, but its a fact that I have only managed to rice pizza dough in a dry AC room. I love the way you show how to make pao, you make it look quite simple. I don’t particularly like the pao in Goa these days as it is kind of tasteless. Bread baking is an art and bread bakers are dying out in Goa. At some point I might just make my own pao at home, thanks to your recipe. 🙂
Thanks Helene. The only reason I ever ended trying this was coz I really missed the ones we get back home. Am so glad I did. I’m sure you will never go back to the store-bought pao once you try making your own 🙂
Nice post and your buns have come out well. Thanks for sharing
Thanks, Jayashree 🙂
Tried your recipe, turned out well and gave me the confidence to bake bread, thank you
Hi Nitish! Thanks for sharing your feedback:) Glad to know!
My Pav always come out light brown. Which rack should I put?
I always bake in the middle rack , Arshi. You may need to check your oven temperature using an oven thermometer, just to make sure it’s calibrated.
Thanks, made the pau yesterday and the results were phenomenal!!
Thanks for your feedback 🙂 glad to know !
When do we add the sugar? I have already starting making this recipe so I’m assuming it goes with the yeast? Also the list of ingredients doesn’t mention how much butter we need to add, so I am going with the pictorial and adding approximately 2 tbsps. Really great recipe but I would appreciate if you could update it with the couple details that I thought were missing. I’m sure you all can probably still make this recipe without those details but it will help a first timer like me!! Thanks from a fellow Goan..
Hi ! Thanks 🙂 I guess you’ve missed out step 1 where it’s mentioned to add sugar to activate the yeast, quantity of butter is already mentioned in the ingredient list.
Beautifully explained Freda! You are tempting me to put on my baker’s hat and try this today 🙂 They look gorgeous…
Thanks a lot 🙂
Can you please explain how do these rolls are connected after baking? We place them with a distance in the baking tray, correct?
Yes they rise the second time, you can check the pictorial
Thank you Freda for the amazing recipe. i had tried making dinner rolls from some other recipe and it never really turned out the way they should & i was disappointed, had given up until i came across your recipe and decided to give it one more shot and i can’t explain the excitement as all was going as per your instructions & they turned out fab. Thank you so much…..
Most welcome, Evra! I’m really happy that this detailed recipe helped you 🙂 Thanks for sharing your feedback.
Thank you for the detailed recipe.. Tried it.. n the rolls were so soft n wonderful.
HAppy to know! Thanks for your feedback Aparna:)
Lovely will try is there a recipe for the kadak version which we eat with sorpotel
Hi Rochel! Thanks 🙂 For the kadak version, bake at 400 F for 30 minutes.
How spoons to use for instant dry yeast
2 teaspoons for instant yeast
I’ve said this before and I’ll say it again Freda. You really spent a lot of time on this wonderful post. Thanks for all those tips and tricks, it makes the tutorial so much easier to understand and replicate. Just as I was thinking of cutting out carbs from my diet, I see this flash on my screen…..I’ll just have to delay that thought now 🙂
Thanks a lot Loretta 🙂 After so many trials, I finally got the little nuances that are essential in getting these right. I hope these pointers will benefit others too 🙂 Carbs are ever so tempting, Sigh!!!
Can I halve the recipe??
Yes you definitely can, adjust the quantity of milk accordingly 🙂
They look so light and fluffy, Freda! Will go great with pav bhaaji 😀 Yumm! Thanks for the detailed instructions!
Glad you liked it, thanks Shamira 🙂
Hi Freda, will definitely try. Can I use a microwave n what is the temperature n timing.
You mean to say microwave convection mode? Then it would be the same timing and temperature.
Omg! Thanks to you and your mom for this recipe! I always stay away from bread making, but the other day I was like maybe I should start with pav buns cause what’s there to not love about them…If you have the traditional bhaji recipe, please post that too..my bhaji is okayish but pretty sure not like Mumbai streets’ pav bhaji. I’ve never been there so don’t really know how they taste?
Hi Lina! Thanks so much 🙂
Will definitely be posting the bhaji recipe, but probably in the next few months. If I can’t will definitely mail you my way of making it 🙂 Well it is spicy and loaded with butter, if you must know 😀
Bread baking has long been on my list of kitchen fears as well! Your bread is lovely, Freda! You are encouraging me to give it a go! Ive made a few but still have a lot of hesitation.
Thanks for the great recipe and wonderful photos!
Thanks Laura, I’m glad you found the post useful 🙂
Freda , came across this post on foodgawker 🙂 wow amazing and beautiful photos. Your pao recipe is so tempting.Adding this to my never ending to do list .Thanks for sharing your Mom’ recipe.
Hi Sravanthi! Thanks for stopping by! I get you, my list is never ending as well. I hope you get a chance to try these 🙂
Such detailed recipe; hope to try it out as I’ve never baked bread – thank you so much for being an inspiration!!
Most welcome, Alcina! Would love to know your feedback 🙂
Thanks for sharing Freda could you please give the recipe for Hot Cross buns sweet buns Thank you
Hi Diana, the recipe is more or less similar to this. You will have to add 1/2 cup sugar to this recipe, and for richness you can add in an egg yolk. You can add in raisins and spices like cinnamon, nutmeg powder. Finally after the second rise, pipe a batter of equal parts of all purpose flour and water ( 1:1 ratio) in the shape of the cross over the bun and bake at 375F until golden brown. You will have to place the buns some distance apart, so they don’t stick to each other after the second rise and on baking, in order to retain the shape. I hope to share the recipe in detail around Easter 🙂
Awesome recipe
Thanks a lot 🙂
They look so soft and fluffy!!! Anytime better than store bought pav buns.
Thanks so much 🙂
Such delicious Pav buns Freda 🙂 Cant take my eyes off them!
Thanks dear 🙂
Love the crispy finish! Thanks for sharing.
By far my most fav post of yours.. Just loved everything about this recipe..
Thanks a lot dear 🙂
Those rolls are amazing Freda, your tutorial is perfect and so are the rolls. Really well done,
Thanks a lot Suzanne 🙂
Superb colour. Will definitely give this a shot. 🙂
Thanks Sonal, please do share your feedback 🙂
Freda! These look absolutely perfect; so fluffy and light on the inside. Very impressed 😀
Thanks Jess 🙂
Detailed recipe… Great job Freda ☺…Rolls look perfect ?
Thanks dear 🙂
I made very similar rolls today for the first time turned out really good too. Next time I will try your recipe!!
Thanks Tarina, it is pretty much a basic recipe, I have tried to add in technical details as much as possible 🙂
Superb post Freda!!! Love the recipe and the detailed instructions. 🙂
Thanks dear 🙂
Used your recipe for Eggless Ladi Pav…turned out perfect! Thank you!
Loved your detailed instructions!!
Hi Roshni! Thanks so much for coming back and sharing your feedback! Really appreciate it 🙂
Hi Freda,
First of all, thank you for this amazing recipe.
After having lived in Mumbai for years I was so determined to find that one perfect ladi pav recipe that wasn’t buttery or dense or sweet like most of the recipes on the net.
This ladi pav recipe is my most treasured recipe that im so happy to find after coming across your page.
Keep cooking and keep sharing your amazing recipes. We are sooo happy to learn from you😊😊
Hi Shirley!! I’m so happy to hear this postive feedback from you. Glad this recipe delivered whatever you were searching for. Thanks so much for coming back and sharing your feedback with us, I truly appreciate it 🙂