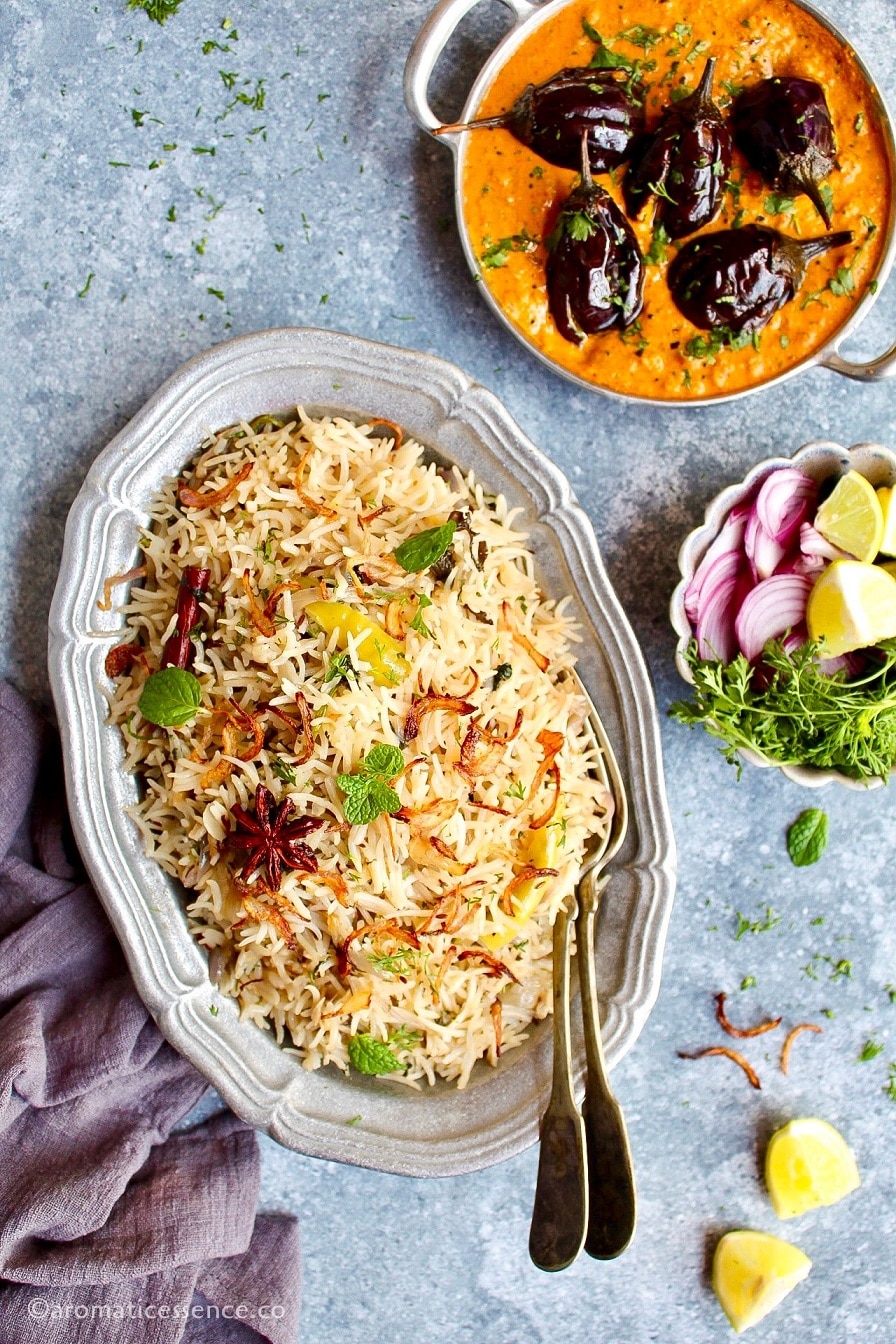
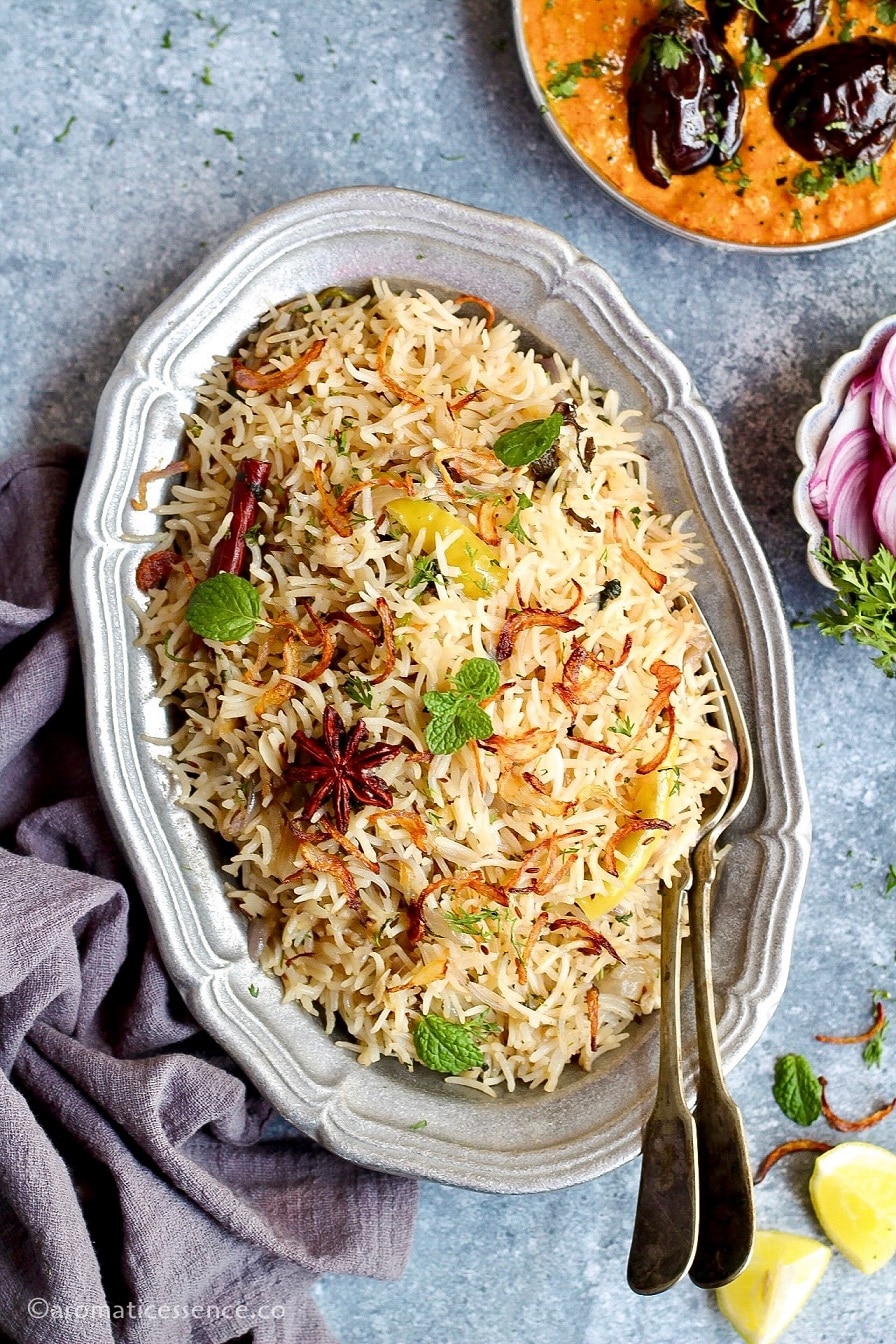
Bagara rice also known as bagara chawal is a popular Hyderabadi rice dish flavored with aromatic spices, caramelized onions, fresh coriander, and mint leaves. Here’s a quick video recipe that shows you how to make bagara rice at home.
Rice dishes are often my top choice when it comes to one-pot meals. And there are a variety of Indian rice dishes, from the popular biryani’s to pulao’s, so one is really spoilt for choices.
Today’s recipe is from the delicious Hyderabadi cuisine, one that is known for its rich biryani’s, kababs, and curries! Haleem, double ka meetha, mirchi salan, mutton dalcha, and of course the dum biryani’s are some of my favorite Hyderabadi dishes.
I’m actually surprised that I’ve not yet shared this simple bagara rice recipe yet on the blog given the fact that I make it often. It is a really simple recipe and a great alternative to preparing elaborate biryani’s.
Table of Contents
What is the meaning of bagaar?
Bagaar means tempering in Hindi. In this recipe, a tempering of whole spices, ginger, garlic, onions, and herbs is prepared. Water is added to the tempering and brought to a boil, then rice is added and cooked. Hence it is known as bagara rice.
The tempering is important in this recipe, as it is of the essence in this dish. Bagara rice is also known by other names such as bagara khana or bagara annam.
It is often prepared during weddings, festivals, and other special occasions along with the other popular Hyderabadi delicacies.
You will enjoy this recipe as it is
- So easy to prepare
- Tastes delicious
- Mildly-spiced, making it kid-friendly
- Can be customized
- Perfect for special occasions or regular weekday meals
Ingredients needed to make this rice dish
To make this simple yet tasty Hyderabadi rice dish, you will need the following ingredients;
Rice: I’ve used basmati rice for this recipe. You can use regular rice if you intend to make this for regular meals. But if it’s for a special occasion, please do use basmati rice.
Cooking fat: Use ghee for a delicious flavor!
Whole spices: I’ve used cinnamon, green cardamom, bay leaf, star anise, cloves, peppercorns, mace, shahi jeera, kapok buds, and stone flower. Depending on where you live, you may or may not have access to kapok buds, also known as marathi moggu, and stone flower known as dagad phool or biryani phool. So feel free to skip these, the rice will still taste good.

Onions: I like to use a lot of thinly sliced onions as the caramelized onions add a great depth of flavor to this simple dish. The more onions you add, the darker the color of the rice will be, and obviously, it will be more flavorful.
Green chillies: Adds a very subtle kick and flavor. Of course, you can adjust to taste. I’ve used the less spicy chilli variety to keep this dish kid-friendly. You may skip it too. You can also use jalapenos or serrano chile peppers.
Ginger and garlic: Please try and use freshly minced ginger and garlic rather than the readymade paste. It makes a lot of difference in any recipe.
Fresh herbs: Coriander and mint leaves
Salt: To season!
Garam masala: Optional but recommended!
Liquid: I’ve used water, which is what is used in the traditional recipe. But you can also use vegetable stock or chicken stock for a non-vegetarian version. The stock definitely makes this bagara rice tastier.

How to make Hyderabadi bagara rice recipe – Step by step process
Stovetop Method
Step 1: Rinse and soak the rice
Rinse 1 cup of basmati rice until the water runs clear, soak it in 2-3 cups of water for 30 minutes. (Photo 1)
In the meanwhile, prep your ingredients.

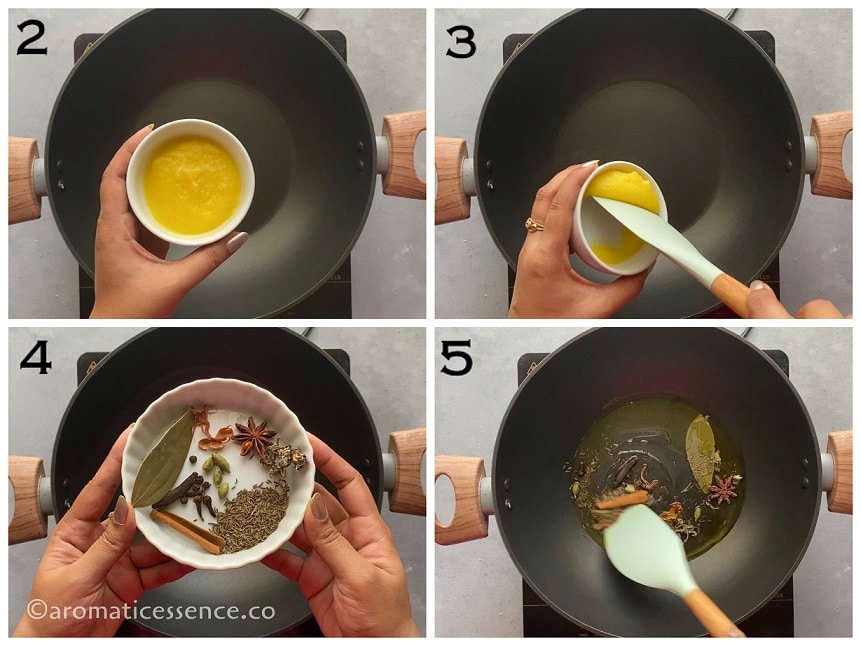
Step 2: Saute whole spices
Heat 2 tablespoons of ghee in a heavy-bottomed pot over medium heat, add 1 teaspoon shahi jeera, 2-inch cinnamon, 4 green cardamoms, 2-3 blades of mace, 1 bay leaf, 1-star anise, 2-3 cloves, 5-6 peppercorns, 1 kapok bud, and 1 teaspoon stone flower.
Saute for a few seconds until the spices are fragrant. (Photos 2 to 5)
Step 3: Saute onions, green chillies, ginger, garlic, and herbs
Next, add 2 cups of sliced onions, saute until the onions turn golden brown. (Photos 6 and 7)
Add 2 slit green chillies, 1/2 tablespoon minced garlic, and 1 teaspoon minced ginger, saute until fragrant. (Photos 8 and 9)

Add 1/4 cup of each chopped coriander and mint leaves, saute until the herbs wilt. (Photos 10-12)

Step 4: Add the remaining ingredients and cook rice
Next, add 1/4 teaspoon garam masala and 3/4 to 1 teaspoon of table salt, saute for a few seconds. (Photos 13 to 15)

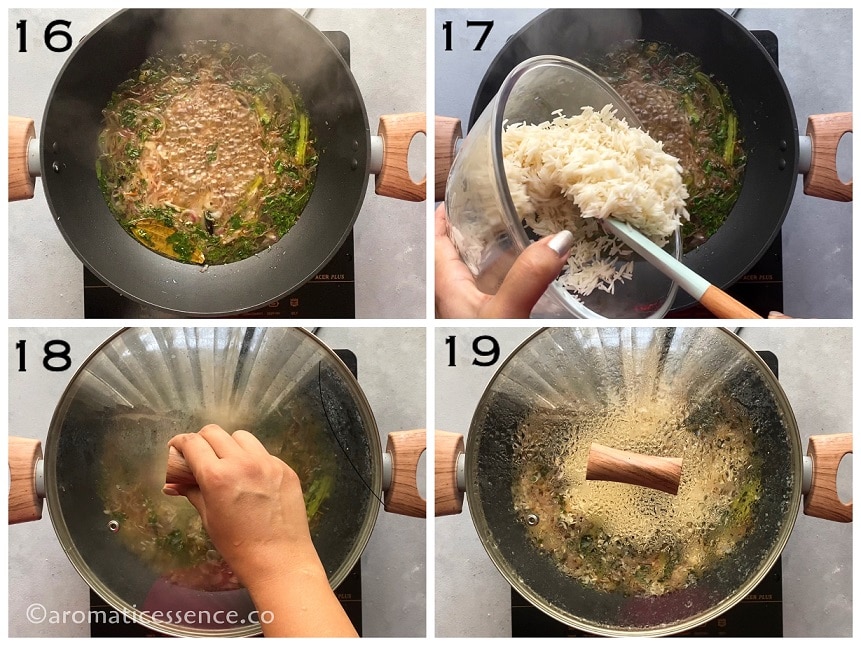
Add 1.75 cups of water, mix well, and bring to a boil. (Photo 16)
Check for seasoning, the water should taste salty. Add more salt if needed.
Add the drained rice, and mix well, reduce the heat, cover the pot and simmer for 10 minutes or until all the water is absorbed and the rice is done. (Photos 17 to 19)
Step 5: Let the rice rest for 10 minutes
Switch off the heat and let the rice stand undisturbed, with the lid on, for 10 minutes. Open the lid and fluff the rice with a fork. (Photos 20 and 21)

Instant Pot Method
Press the ‘SAUTE’ button, and set it to ‘NORMAL’. Once it displays, ‘HOT’, then add 2 tablespoons of ghee, let it heat up a bit, add 1 teaspoon shahi jeera, 2-inch cinnamon, 4 green cardamoms, 2-3 blades of mace, 1 bay leaf, 1-star anise, 2-3 cloves, 5-6 peppercorns, 1 kapok bud, and 1 teaspoon stone flower, saute for a few seconds until the spices are fragrant. (Photos 22 and 23)

Add 2 cups of sliced onions, saute until the onions turn golden brown. (Photos 24 and 25)

Add 2 slit green chillies, 1/2 tablespoon minced garlic, and 1 teaspoon minced ginger, saute until fragrant. (Photo 26)
Add 1/4 cup of each chopped coriander and mint leaves, saute until the herbs wilt. (Photos 27 and 28)
Next, add 1/4 teaspoon garam masala and 3/4 to 1 teaspoon of table salt, saute for a few seconds. (Photos 28 and 29)
If you have browned bits stuck at the bottom of the pot, deglaze it with about 2 tablespoons of water to avoid a potential ‘BURN’ error. (Photo 31)

Add 1 cup of water and give everything a good mix. Check for seasoning, the water should taste salty. Add more salt if needed. (Photo 32)
Drain the rice and add it to the pot. Make sure the rice is submerged under the liquid. (Photo 33)
Press ‘CANCEL’ to switch off the “SAUTE’ mode. Close the lid of the Instant Pot. Set the valve to ‘SEALING’. Pressure cook on high for 4 minutes. It will take some time for the pressure to build up (about 6 minutes), after which the timer will begin. (Photo 34)

Once the cooking cycle is complete, let the pot depressurize for 10 minutes. Then do a quick release of the leftover pressure as per the manufacturer’s instructions. Press ‘CANCEL’ and switch off the IP. Once the silver pin drops, turn the knob to ‘VENTING’ and open the lid away from you.
Fluff the rice with a fork. (Photos 35 to 37)

Serving suggestions
This rice is often served with mutton dalcha. You can serve it with your favorite mutton/chicken curry or biryani gravy. You can also serve this rice with a simple dal/kadhi or any of the vegetarian curries like stew, veg kurma, etc.
Today I’ve served it with one of my favorite eggplant dishes, bagara baingan. The combination was a truly finger-licking, delicious vegetarian treat! So good :p
If you are pressed for time to prepare a curry, simply serve this flavorful rice with some rice, papad, and a spicy pickle! Yum!!

Storage instructions
Since this is a small batch, ideally, you won’t have leftovers. But if you do intend to refrigerate it, make sure you do so within one hour of cooking the rice. Refrigerate in an airtight container for 1-2 days.
Sprinkle some water, and reheat in a microwave-safe bowl or in a skillet over medium-low heat, until heated through.
Tips to make this recipe
Don’t skimp on the ghee: Ghee adds a great deal of flavor to this humble dish, so definitely use it instead of any cooking oil.
Fry the onions on low heat: This step requires patience, but you have to mindful of the onions. If they brown too much, they will impart a bitter taste to the final dish.
Use the herbs: Avoid skipping the coriander and mint leaves, as they add a nice herby note to the rice. If you are not a fan of coriander, skip it. But I don’t suggest skipping the fresh mint. You can use dried mint powder if you don’t have fresh mint.
Check for salt: As soon as you add the water and bring it to a boil, check for salt. The water should taste salty enough for the final rice dish to be seasoned well. If it’s not salty, adjust at this stage itself or you’ll end up with bland rice.
Let the rice rest: After the rice is done cooking, it is imperative to leave it undisturbed for at least 10-15 minutes. Do not fluff it with a fork right away, as the rice continues to absorb moisture even after cooking. Letting it rest will ensure that the rice doesn’t get clumpy, and you have distinct, separate grains while serving.

Variations
Add vegetables: You can add veggies like carrots, corn, peas, green beans, bell peppers or even diced mushrooms, etc to make this a wholesome one-pot meal.
Add proteins (vegetarian version): To make it heartier, add cooked chickpeas, beans, sprouts, paneer, or tofu.
Turmeric: You can add about 1/4 teaspoon of ground turmeric to give this dish a yellow hue!
Add nuts and/or raisins: You can saute about 8-10 cashew nuts, split into halves, and 2 tablespoons of golden raisins in ghee until the cashew nuts turn golden brown and the raisins puff up. Set aside and follow the recipe from step 1. Add the roasted cashew nuts and raisins in the last step after fluffing the rice for some texture and hint of sweetness in this dish.
Chicken: Dice up about 1 boneless chicken breast or 2 chicken thighs into 1-inch chunks. Marinate with ginger garlic paste, yogurt, lemon juice salt, and pepper. Add it to the pot after sauteing the green chillies, ginger, and garlic. Saute on medium-high heat until the chicken pieces turn opaque, about 4-5 minutes. Then follow the rest of the recipe as stated above.
Frequently asked questions
How to make this recipe in a stovetop pressure cooker?
Follow the same steps as above. Reduce the water to 1.5 cups. Cook on high for 2 whistles, then let the pressure release naturally. Open the lid and fluff the rice with a fork.
Can I make this vegan?
Yes, you most certainly can. Use any vegetable oil of choice for a vegan version.
Which is the best rice to use for this dish?
Like I mentioned above, it is best to use basmati rice for this recipe. Basmati is long-grain rice, known for its aroma, flavor, and texture. But if you are preparing this for your regular meals, you can use sona masoori rice. You can also consider using brown basmati rice.
Can I make this leftover rice?
It will work in a pinch. But, honestly, you can make use of your leftover rice in other recipes like lemon rice, cabbage rice, masala rice, etc. Use uncooked rice for best results.
What can I use instead of rice?
You can swap the rice with quinoa to make bagara quinoa instead. The process is the same. Be sure to rinse the quinoa, there is no need to soak it.
The ratio of quinoa to liquid is 1:2, though I prefer a 1:1.75 ratio. For the Instant Pot, follow a 1:1 ratio. You can refer to this Instant Pot quinoa pulao for more details.

You may also enjoy these Indian vegetarian rice recipes
Moong sprouts and paneer pulao
★ If you try this bagara rice recipe, I would love to hear from you! I’d appreciate it if you could rate and leave a review below in the comments. Your reviews help others know the recipe better too. Feel free to share your feedback and suggestions at aromaticessence77@gmail.com. Thanks so much 🙂
You can also follow me on Facebook, Pinterest, Instagram & Twitter

Bagara Rice Recipe
Ingredients
- 1 cup basmati rice 190 grams
- 2 tablespoons ghee
- 2 cups sliced onions
- 2-3 green chillies, slit lengthwise
- 1/2 tablespoon minced garlic
- 1 teaspoon minced ginger
- 1/4 cup chopped mint leaves
- 1/4 cup chopped coriander leaves
- 1/4 teaspoon garam masala, optional
- 1.75 cups water, 1 cup for the Instant Pot
- 3/4 to 1 teaspoon table salt, or to taste
Whole spices (You may skip some of these if you can't find them)
- 1 teaspoon shahi jeera
- 2 inch cinnamon
- 4-5 green cardamoms
- 2-3 blades of mace
- 1 bay leaf
- 1 star anise
- 2-3 cloves
- 5-6 peppercorns
- 1 kapok bud
- 1 teaspoon stone flower
Instructions
Stovetop Method
- Rinse basmati rice until the water runs clear, soak it in 2-3 cups of water for 30 minutes.

- In the meanwhile, prep your ingredients.
- Heat ghee in a heavy-bottomed pot over medium heat, add all the whole spices.
- Saute for a few seconds until the spices are fragrant.

- Next, add sliced onions, saute until the onions turn golden brown.
- Add slit green chillies, minced garlic, and minced ginger, saute until fragrant.

- Add chopped coriander and mint leaves, saute until the herbs wilt.

- Next, add garam masala and table salt, saute for a few seconds

- Add 1.75 cups of water, mix well, and bring to a boil. Check for seasoning, the water should taste salty. Add more salt if needed.
- Add the drained rice, and mix well, reduce the heat, cover the pot and simmer for 10 minutes or until all the water is absorbed and the rice is done.

- Switch off the heat and let the rice stand undisturbed, with the lid on, for 10 minutes. Open the lid and fluff the rice with a fork.

Instant Pot Method
- Press the 'SAUTE' button, and set it to 'NORMAL'. Once it displays, 'HOT', then add ghee, let it heat up a bit, add all the whole spices, saute for a few seconds until the spices are fragrant.

- Add sliced onions, saute until the onions turn golden brown.

- Add slit green chillies, minced garlic, and minced ginger, saute until fragrant.
- Next, add garam masala and table salt, saute for a few seconds.
- If you have browned bits stuck at the bottom of the pot, deglaze it with about 2 tablespoons of water to avoid a potential 'BURN' error.

- Add 1 cup of water and give everything a good mix. Check for seasoning, the water should taste salty. Add more salt if needed.
- Drain the rice and add it to the pot. Make sure the rice is submerged under the liquid.
- Press 'CANCEL' to switch off the "SAUTE' mode. Close the lid of the Instant Pot. Set the valve to 'SEALING'. Pressure cook on high for 4 minutes. It will take some time for the pressure to build up (about 6 minutes), after which the timer will begin.

- Once the cooking cycle is complete, let the pot depressurize for 10 minutes. Then do a quick release of the leftover pressure as per the manufacturer's instructions. Press 'CANCEL' and switch off the IP. Once the silver pin drops, turn the knob to 'VENTING' and open the lid away from you.
- Fluff the rice with a fork.

Video
Notes
Nutrition
Leave a Reply